Open topic with navigation
Step 3: Modify Loop Conditions and Execute the Sequence
In this step, you will learn how to modify the loop parameters for the Power Supply's Sweep block, save the Sequence to a file, and then execute the Sequence.
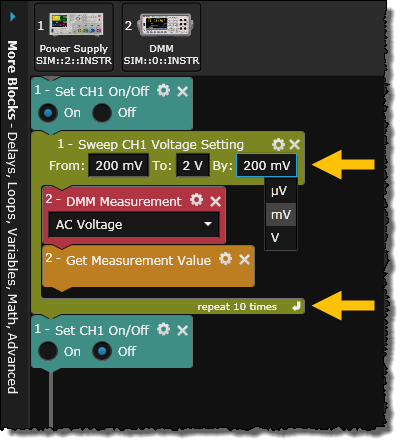
- From the Sweep block for the Power Supply, set the sweep parameters to step from 200 mV to 2V in increments of 200 mV. When the Sequence is executed, the Sweep block will repeat a total of 10 times.
Note: When creating a Sequence that will potentially generate a large amount of data, please note that BenchVue will enforce a limit of approximately 100,000 steps. In this context, a step implies any block that will generate data when the Sequence is executed.
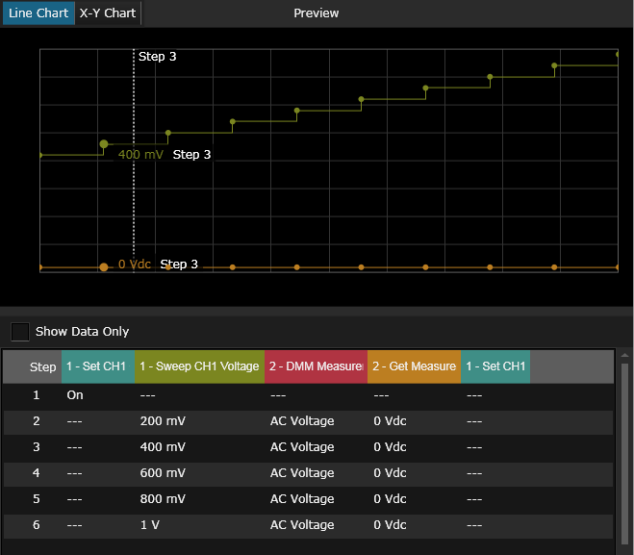
- To verify your steps before executing the Sequence, you can use the Preview area, located to the right of the Sequence Workspace (if necessary, use the slider bars to resize the Preview area). This area gives you a visual preview of the Sequence steps in line chart and X-Y chart form. Use your mouse to hover over specific data points in the chart.
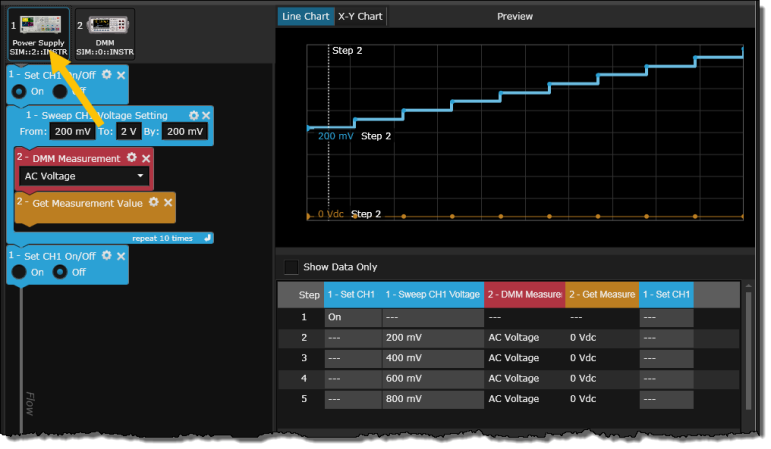
- As another way to verify your steps before executing the Sequence, you can click on the instrument icons in the Sequence Workspace. The blocks in the Sequence that relate to the selected instrument are highlighted in light blue – the corresponding data in the Preview chart and data table are also highlighted as shown below.
- Click the Save or Save As button on the bottom toolbar of the Test Flow panel to save the current Sequence to a file on your computer. By default, the Sequence file is stored in the "Documents" folder on your computer with a .bvseq file extension – C:\Users\<user_name>\Documents\Keysight\BenchVue\States\.
For this example, save the Sequence in the default location on your computer with a filename "My First Sequence.bvseq".
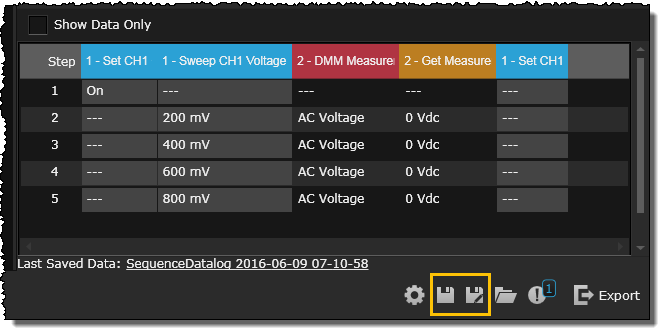
Note: Saving the Sequence file does not store any Sequence data. To save your Sequence data, use the Export operation.
- Click the Start button on the bottom toolbar of the Test Flow panel to run the Sequence. The blocks are executed in order from top to bottom and the resulting test data is plotted on the chart and in the data table. Use your mouse to hover over specific data points in the chart.

Each time you execute a Sequence, the results are automatically stored in the BenchVue Data Manager.

Congratulations! You have completed the tutorial. Now you can start creating your own custom Sequences. This Help file contains a number of advanced topics available from the Help Contents tab or by searching the Help. Be sure to also check the BenchVue Library for additional example Sequences and tutorial videos.